Web interface
This chapter describes all pages available in the web interface and all settings that can be made. The web interface also links to specific sections in this chapter for help information.
First page
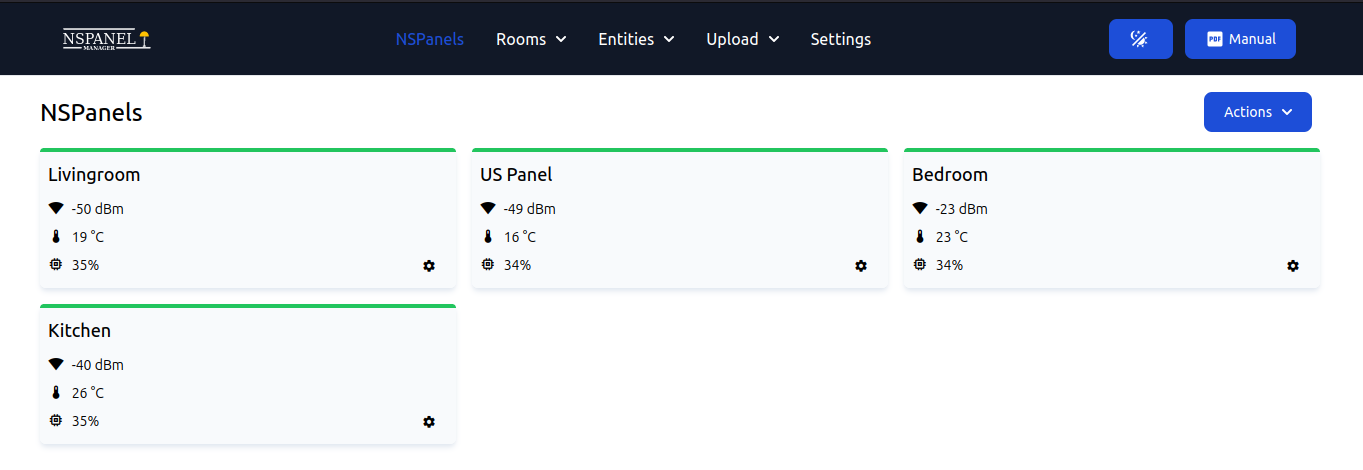
The first page is used to get an overview of each registered NSPanel as well as perform actions on each panel individually or all at once. These actions are available in the menu accessed by pressing the cog.
The available actions are:
- Reboot - Reboot the NSPanel.
- Settings - Navigate to the NSPanel settings page where individual settings for the panel can be made. This page can also be accessed by pressing the name of the panel.
- Visit - Visit the web page that is on the panel itself. This is the same page that was used to enter initial WiFi and MQTT information.
- Firmware update - Send a command to the NSPanel to update the firmware. The firmware will be downloaded from the manager.
- GUI update - Send a command to the NSPanel to update the screen. The screen firmware will be downloaded from the manager.
- Delete - Delete the nspanel from the manager.
There is also the "Actions"-button on the top right where you can perform some of the actions from the list above to all panels which are online. There is also an option to Restart MQTTManager which will restart the core component that handles all communication between different components of the NSPanel Manager software and Home Assistant and/or OpenHAB.
NSPanel page
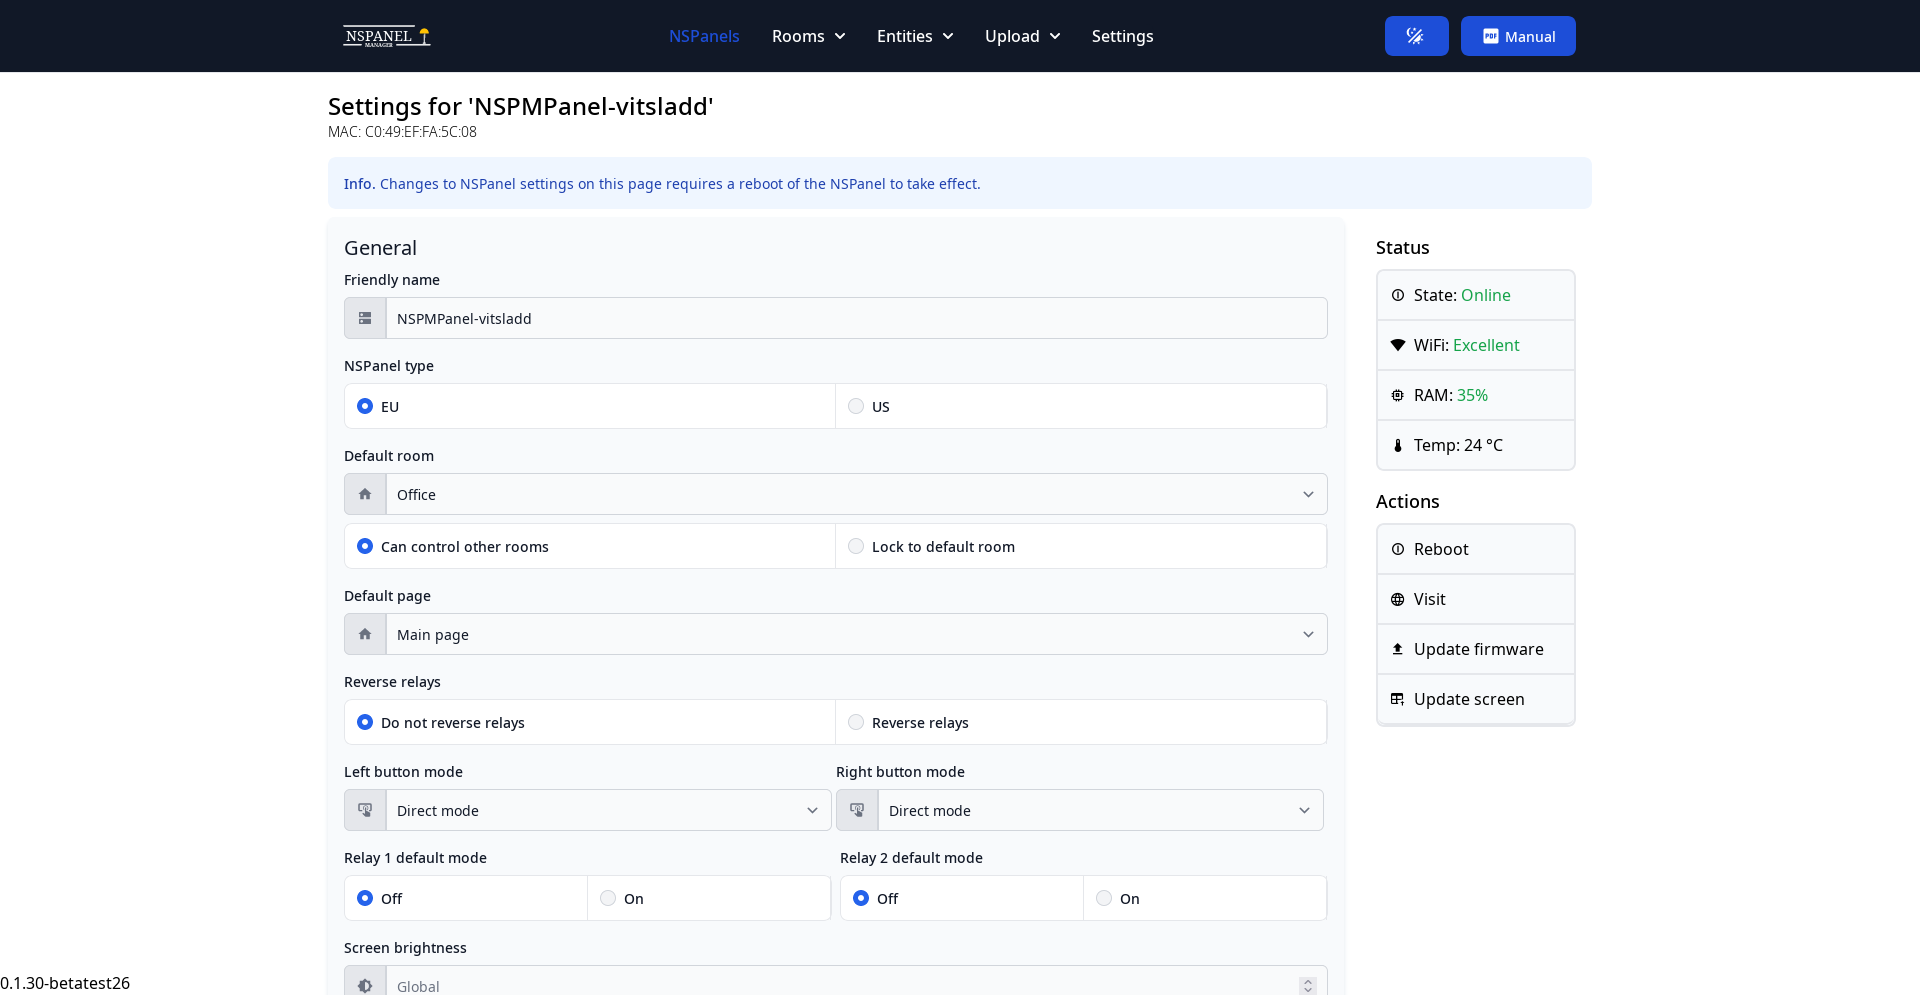
The NSPanel settings page is used to configure specific settings for each individual NSPanel. This includes things like NSPanel type (EU/US), the room it is installed in, name and so on. See below for a complete list of options.
The page can also be used to look at the live stream of logs from the NSPanel and send commands to the panel. What is displayed in the log view is dependent on what log level is configured on the settings page on the panel itself.
Available options
Available options for each individual NSPanel are:
- Friendly name - The name of the NSPanel.
- NSPanel type - The type of NSPanel, either EU or US.
- NSPanel type & orientation - The type of NSPanel, either EU or US and orientation.
- NSPanel preview - This is a preview of the selected NSPanel type, orientation and selected background.
- Default room - Select the default room for the NSPanel. This is the room that will be selected in the GUI after the NSPanel has booted and after the screensaver has been active. It is also possible to lock the NSPanel to the default room so that it can’t control entities in other rooms.
- Default page - Select a different default page. Available options are:
- Main page - The default page with sliders and buttons for light control.
- Scenes page - The page where scenes can be activated and saved.
- Entities page (Previously Room Page) - The page that is used to control individual entities.
- Reverse relays - Reverse the relays. This is the same as switching places of the cables on the back of the NSPanel. All actions meant for relay 1 will be applied to relay 2 and vice versa.
- Left/Right Button mode - Change the mode of a button. Available options are:
- Direct mode - The buttons controls the relay directly. No WiFi is needed.
- Detached mode - Detached mode controls an entity via your selected home automation platform. Do not however that not all entity types support the toggle mechanism.
- Custom MQTT - This mode can be used to send a custom message on a custom MQTT topic.
- Follow mode - When the button is pressed the relay is engaged, when the button is release the relay is disconnected.
- Relay 1/2 default mode - Select the default mode of the relay when the NSPanel starts.
- Register relay 1/2 as:
- Switch - The relay will be registered to Home Assistant as a switch entity.
- Light - The relay will be registered to Home Assistant as a light entity.
- Screen brightness - The brightness of the screen when on (1-100%).
- Screensaver brightness - The brightness of the screen when the screensaver is active (0-100%). A value of 0 means that the screen is off.
- Screensaver avtivation timeout - The amout of time (in milliseconds) before the screensave will be activated.
- Screensaver mode - Select what to display on the screensaver. Available options are:
- Global (use global setting) - Use whatever is set in the "settings" section of the NSPanel Manager.
- Show with background (clock, date and weather) - Show the screensaver with background image with current and forecast weather, time and date.
- Show without background (clock, date and weather) - Show the screensaver with a black background with current and forecast weather, time and date.
- Show with background (no weather) - Show the screensaver with background image but only time and date.
- Show without background (no weather) - Show the screensaver with a black background but only time and date.
- No screensaver (turn off screen) - Make the screen completely black when not in use.
- Screensaver inside temperature - Show or hide inside temperature on screensaver.
- Screensaver outside temperature - Show or hide outside temperature on screensaver. Only available on screensaver page without weather.
- Temperature calibration - Calibrate the internal temperature sensor. Enter a negative value to bring the reported temperature down and vice versa.
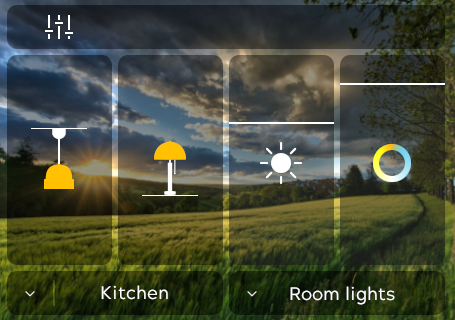
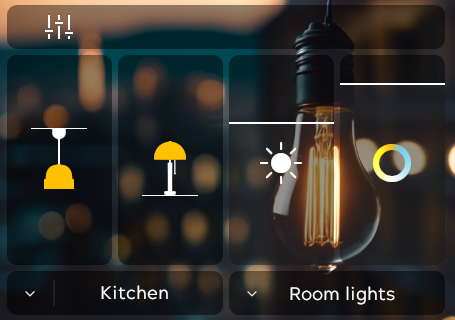
Choose between different backgrounds for the panel
In 2.0 we introduce the possibility to choose between different GUI files resulting in different backgrounds on the NSPanel. There are 4 backgrounds to choose from. To select an image, simply press the middle of the NSPanel preview and a popup will appear. Press the background you want and scroll down and press save. When that's done you need to update the GUI on the panel and it should be up and running with your selected background.
Available Backgrounds (US files have the same background as the EU.)
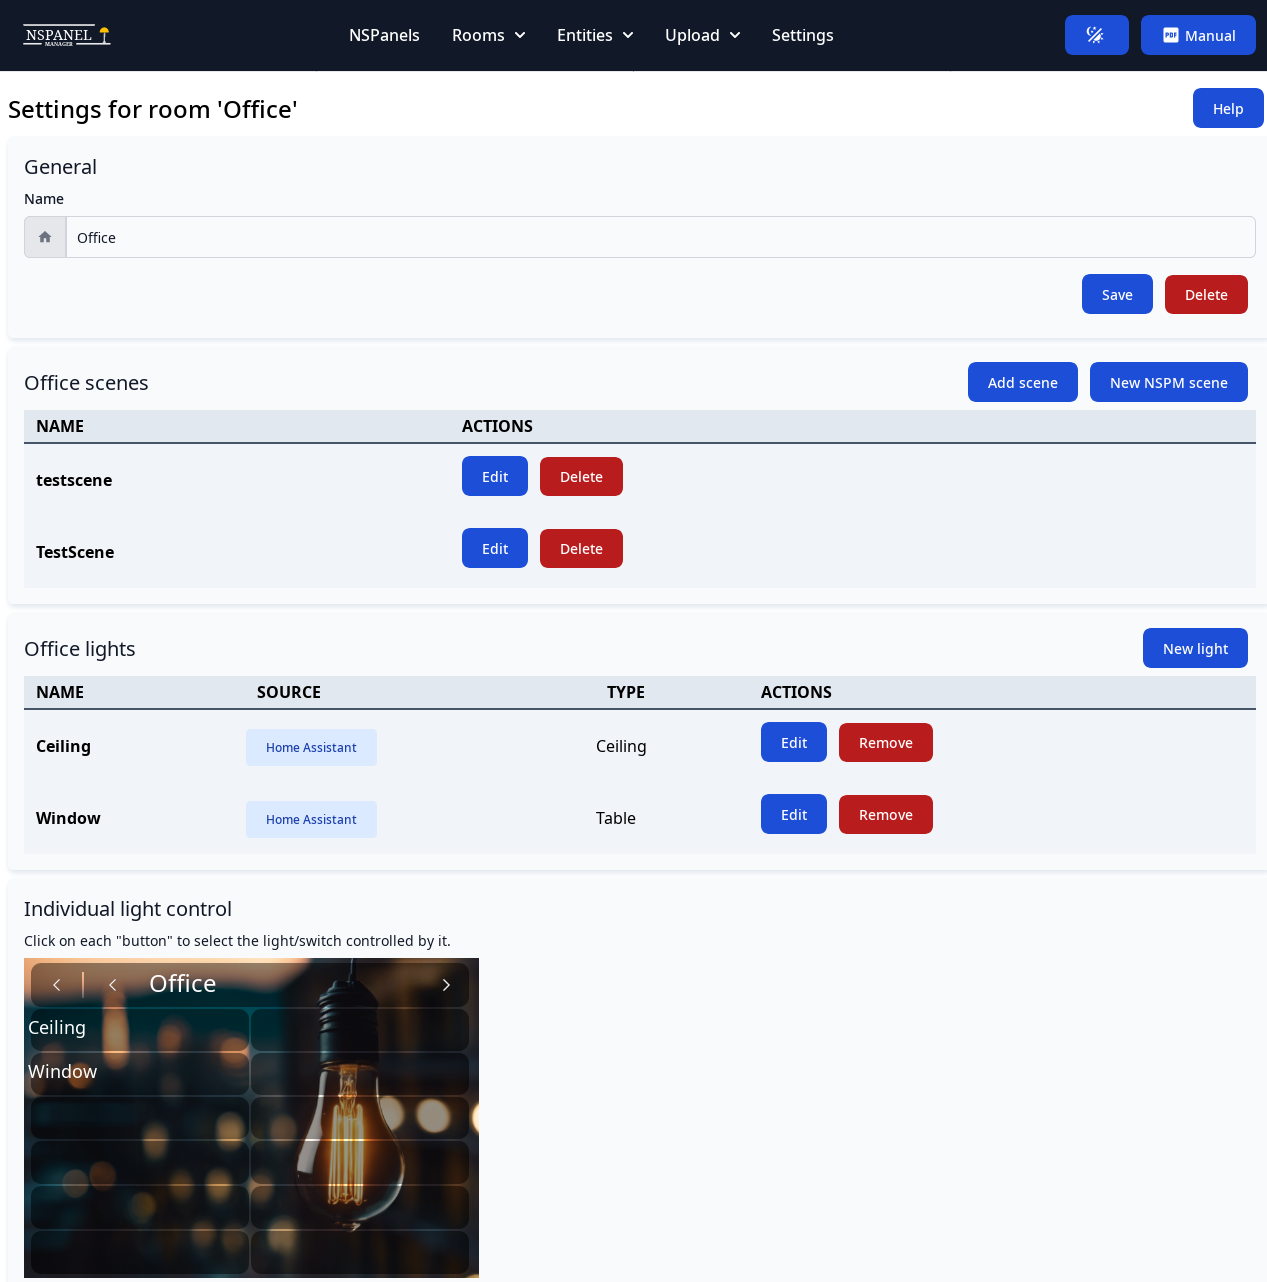
Room page
This section will describe how to manage rooms. Most of the configuration done with NSPanel Manager will be done in rooms, please read this chapter for a full understanding on how to work with rooms.
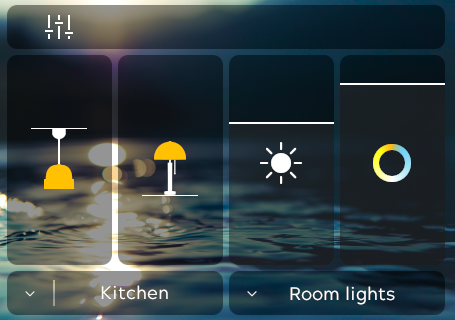
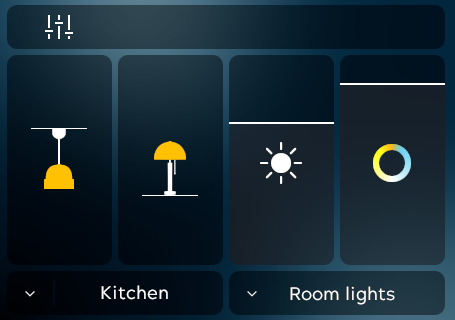
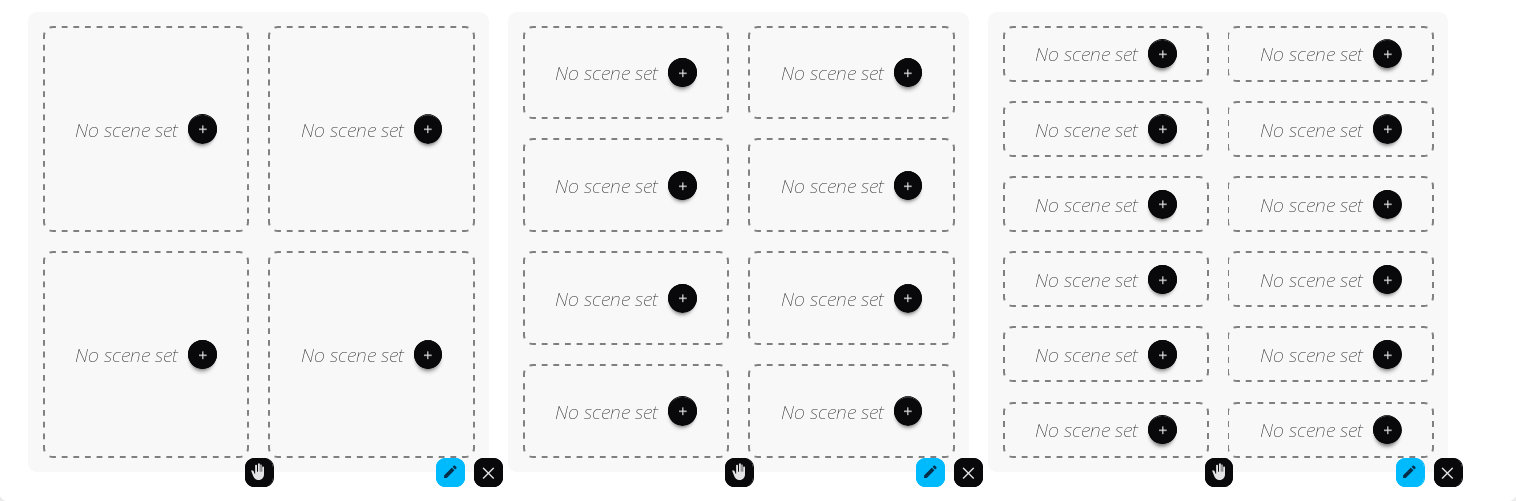
Pages
Both scenes and entities are handled within "Pages". These pages are simple to use and will hold all your scenes and entities. Because the Nextion display used on the Sonoff NSPanel is somewhat limiting there are only predefined pages available. Pages are available in variants to display 4, 8 or 12 entities as displayed below. It's possible to change the type of an existing page by pressing the pen-icon in the bottom right of the page. To reorder pages simply drag and drop them by the hand-icon in the bottom center of the page you wish to move. If you have more than one page avaiable it's also possible to delete a page with all the entities by pressing the cross in the bottom right of the page.
The entities/scenes that are assigned to each slot in the page can also be moved by draging and dropping them into available slots. If an entity/scene is dropped on a slot with an already assigned entity/slot they will swap places.
Scenes
You can choose to use scenes from Home Assistant or OpenHAB though these scenes will not be able to be saved on the fly. This is something that the NSPanel Manager scenes can perform internally but NSPanel Manager scenes will only manage states of lights.
The NSPanel Manager scenes are easy enough to use. Simply create a scene in the room page and they will be available in the "Scenes"-list for the room on all NSPanels.
To save a scene, on the NSPanel hold the save button for the scenes for 3 seconds to save all the states of lights currently added to the room.
To recall/activate a scene, on the NSPanel press the name of the scene and all the saved light states will be restored for that scene.
If a light was added after a scene was saved, that light is not affected by that scene until the scene is saved again.
Global scenes that apply to all rooms are available in the "Entities" -> "Global scenes" menu.
Entities
To add a new entity, simply press the "+"-icon in a free slot on a page and select type. Once that's done you will need to select from which manager the entity is controlled by (Home Assistant, OpenHAB or NSPanel Manager internal entity). In the last step you can configure settings such as display name and any settings specific for that entity type.
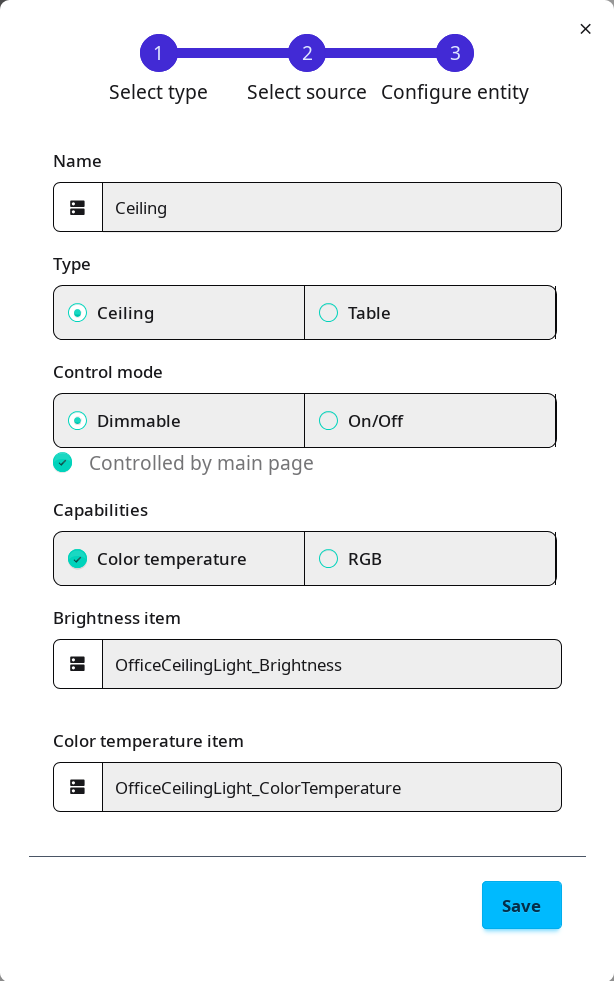
Configure lights
When adding/editing a light entity you get multiple options of charecteristics of the light.
- Name - The displayed name on the NSPanel and web interface.
- Home Assistant Entity HOME_ASSISTANT - The home assistant entity to control.
- Type - is this light a ceiling or table light (as to how it should be grouped/displayed on main page on NSPanel).
- Control mode - Is this light dimmable or it it simply an on/off light.
- Controlled by main page - If this is marked the light will be included in the displayed data and controlled from the main page of the NSPanel. This can be uncheck to still have a given light controllable from the panel but not be changed when changing values on the main page.
- Capabilities - Can this light handle color temperature and/or color.
- Brightness item OPENHAB - Select the OpenHAB item to control the brightness of the light.
- Color temperature item OPENHAB - Select the OpenHAB item to control the color temperature of the light.
- RGB item OPENHAB - Select the OpenHAB item to control the color of the light.

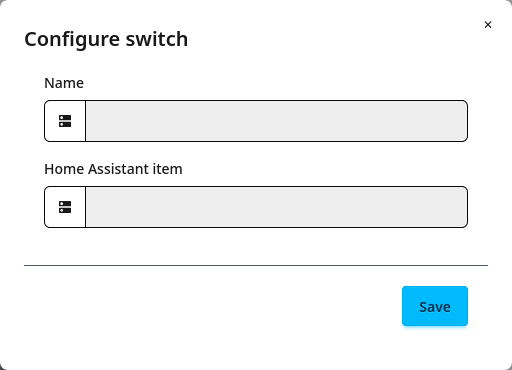
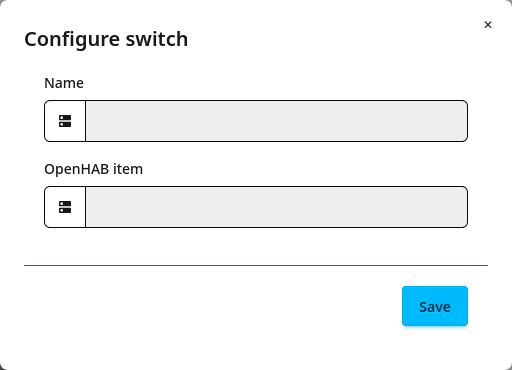
Configure switches
When adding/editing a switch entity you simply get to choose the entity/item and the name to use.
- Name - The displayed name on the NSPanel and web interface.
- Home Assistant item HOME_ASSISTANT - The home assistant entity to control.
- OpenHAB item OPENHAB - The OpenHAB item to control.
Configure Home Assistant buttons
When adding/editing a Home Assistant button entity you simply get the choice of what name to display and also what entity to use.
- Name - The displayed name on the NSPanel and web interface.
- Home Assistant item - This is the button entity in Home Assistant. This can be either an "button." or "input_button." entity.

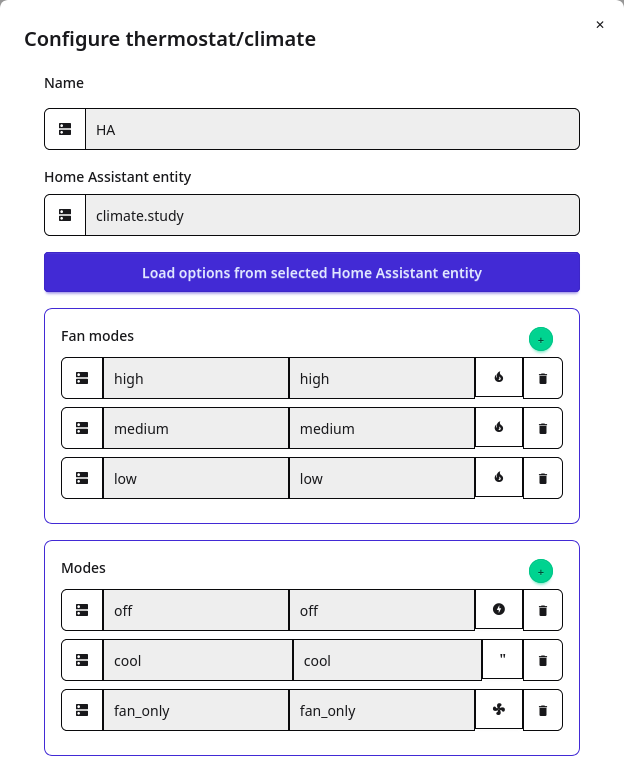
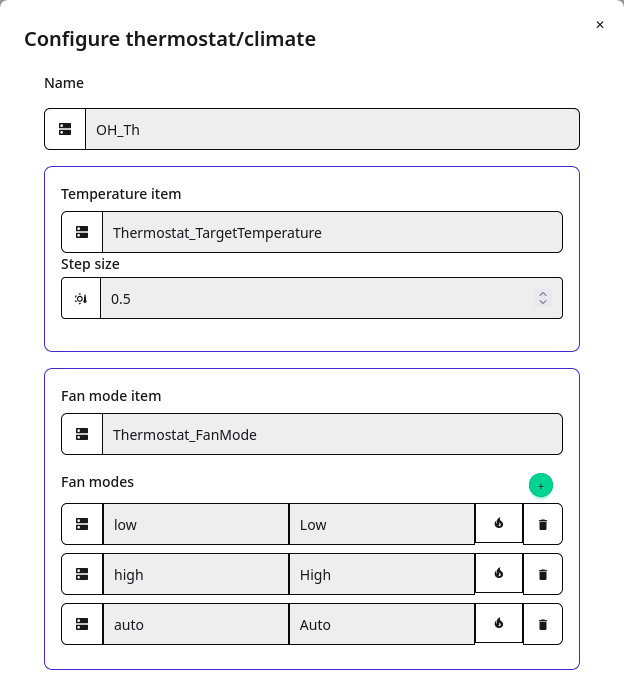
Configure thermostat/climate control BETA
When adding/editing a thermostat/climate entity you get multiple options of characteristics of the entity.
- Name - The displayed name on the NSPanel and web interface.
- Home Assistant Entity HOME_ASSISTANT - The home assistant entity to control.
- Load options from selected Home Assistant entity HOME_ASSISTANT - This button will load all available options from the selected Home Assistant entity and populate the fields below.
- Temperature item OPENHAB - The item in OpenHAB that controls the target temperature.
- Step size OPENHAB - When adjusting the temperature, step the temperature by this value.
Following those settings there will be groups of items/settings to adjust. These are the following:
- Fan mode
- Mode
- Presets
- Swing
- Horizontal swing
Each of these groups have, in case of running OPENHAB, a field for selecting the OpenHAB item that controls it. There is also a table of settings for each group. This table is built so that the user may choose a different display name and icon for each value. The left most field is the value that will be sent to Home Assistant or OpenHAB, the next field is the display name that will be shown on the NSPanel, and the rightmost field is the icon that will be shown on the NSPanel. To change the icon press the button and select the icon from the list.
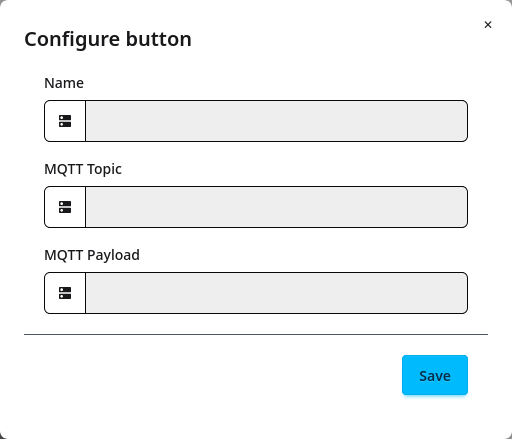
Configure NSPM (MQTT) buttons
An NSPM button entity is controlled by the NSPanel Manager itself. This button entity is simply used to send an MQTT payload to a specified topic. What you do with it is up to you.
- Name - The displayed name on the NSPanel and web interface.
- MQTT Topic - The MQTT topic to send the payload to.
- MQTT Payload - The MQTT payload to send.
Switch
It's possible to add relays/switches as controlled entities from the NSPanel. These are simply on/off and can be toggled from the "Entities page" on the NSPanel.
Relay groups
Relay groups are used to bind multiple NSPanels and relays together so that when one relay in the group changes state, all the relays in the group transissions to the new state.
Weather and Time
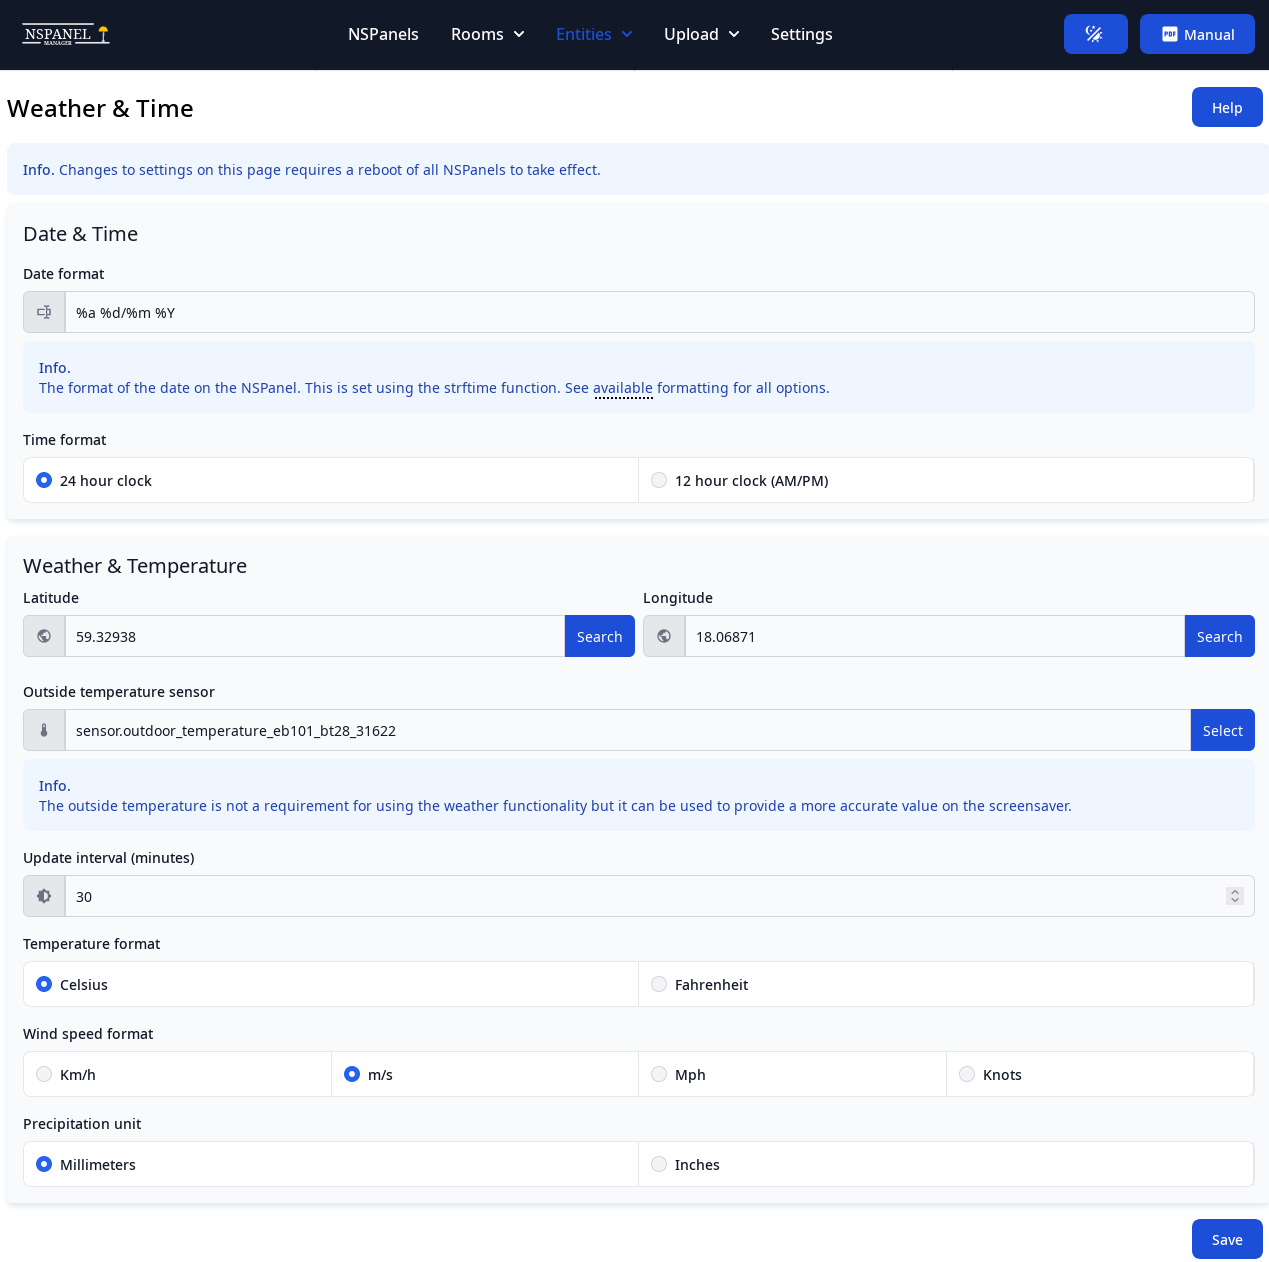
On the Weather & Time page settings related to time, date and weather can be changed. Date format is configured
according to the strftime function and a link to available formatting options is available in the information box or here.
It is also possible to select between 24 and 12-hour clock format.
To configure weather, simply press the "Search" button attached to either the "Latitude" or "Longitude" input fields and search for your city. If it does not show, you can enter your location manually. You can also change between Celsius and Fahrenheit, different wind speed units and also different precipitation units. You can also set the update interval for how often to pull down the current weather and the forecast from Open Meteo.
If you wish to show temperature from a local temperature sensor available in OpenHAB, this can be selected in the Outside temperature sensor but it is not required.
Global settings
These settings will apply to all NSPanels (if they do not have specific configuration overrides), and the NSPanel Manager container. There are two things that need to be set in order to get up and running.
Those are:
- Connection details to the same MQTT server that were set in the NSPanel configuration.
- Connection details to Home Assistant and/or OpenHAB.
Failing to meet both requirements listed above will result in a non-working setup!
The "Manager address" field must be the IP address to the manager and not the web address (with http(s)) and not a hostname/DNS-name.
If running the NSPanel Manager container as a Home Assistant add-on then the Home Assistant connection details will already be configured.
There are also other settings that might be worth taking a look at while here such as showing a clock on the screensaver, how bright the NSPanels should be, the Min & Max of color temperature and so on.
Go ahead and explore by yourself.
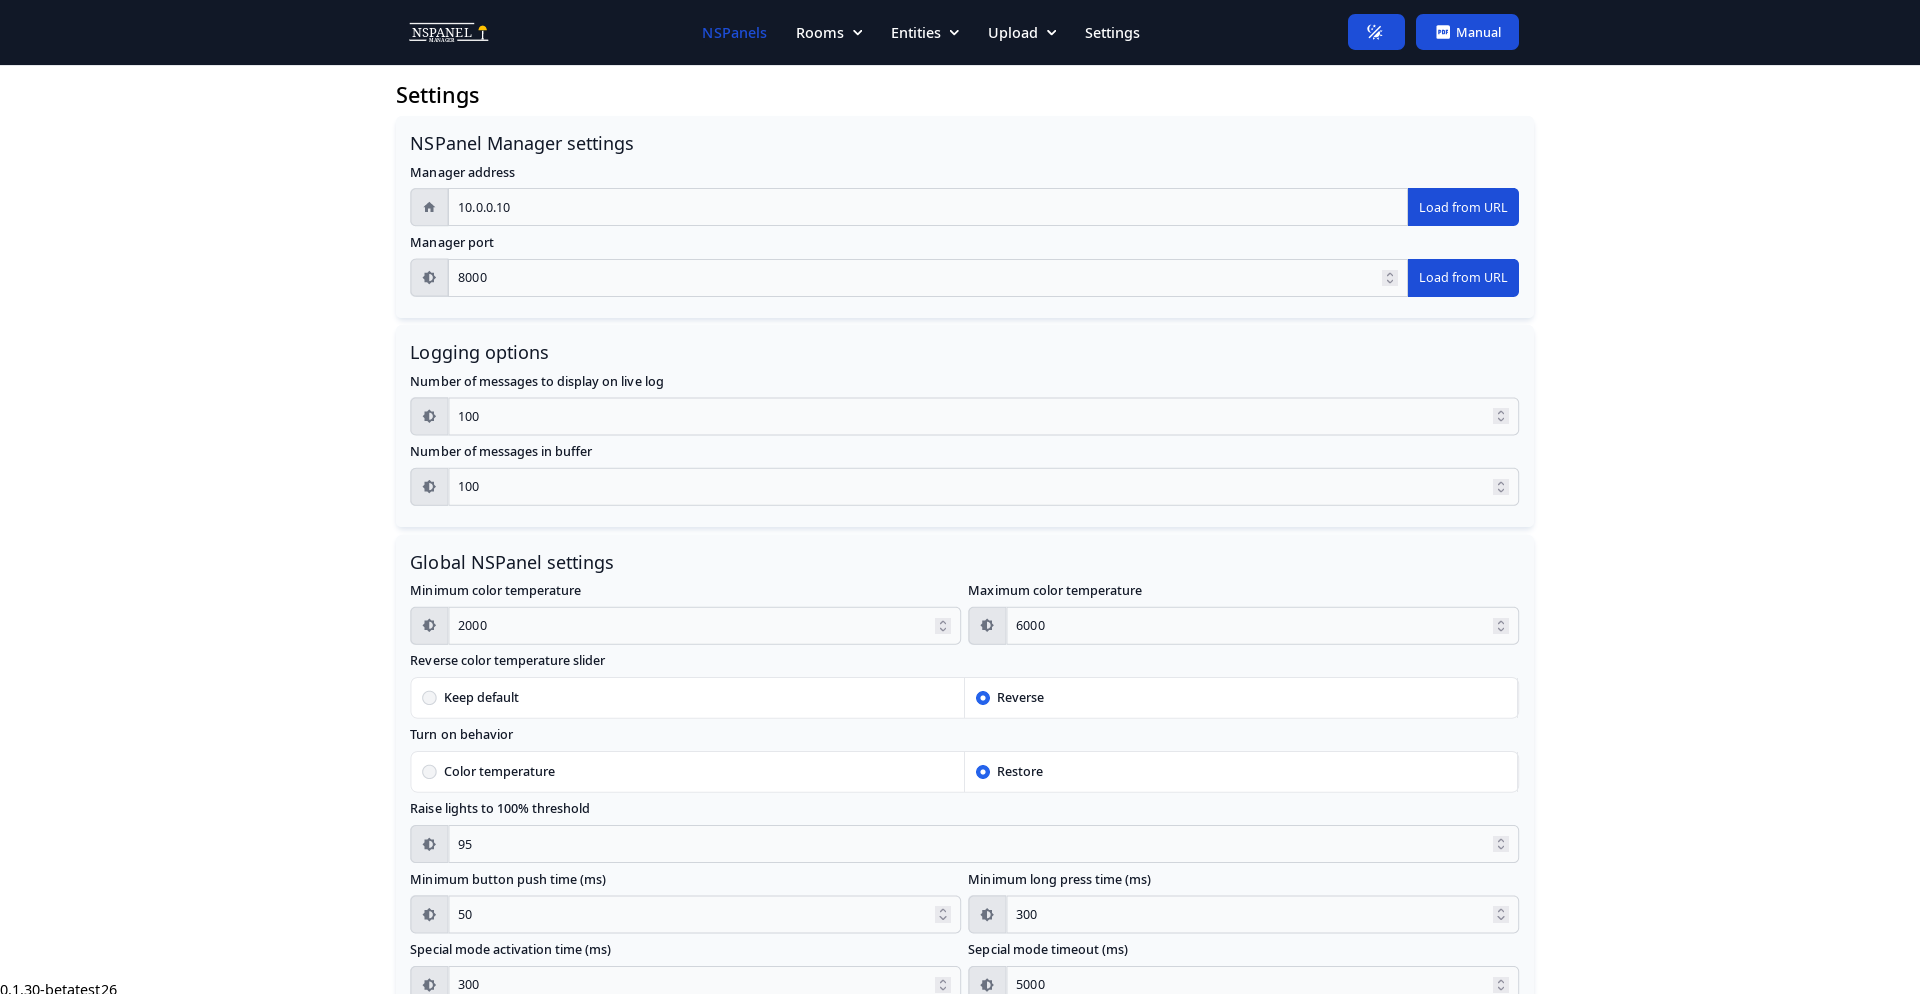
The "Global settings" section of the web interface is where you can settings that apply to all NSPanels or settings that simply are not directly related the panels themselves.
The following options are available:
Connection settings
- Manager address - The is the IP address that will be sent to each NSPanel when it boots. This address is used in the NSPanel to communicate with the manager and has to be reachable from each and every NSPanel.
- Manager port - Port to use when connecting to the above mentioned IP address
Logging options
- MQTTManager log level - Log level for the MQTTManager background component. For more information about MQTTManager see Software components. There is also a "Download"-button available in this section to download the MQTTManager log file as a .txt-file.
- Number of messages to display on live log - The number of log messages to display in the live log for each NSPanel in the NSPanel settings page.
- Number of messages in buffer - The number of log messages to keep in buffer in the MQTTManager.
Global NSPanel settings
- Minimum color temperature - The minimum kelvin to send to Home Assistant/OpenHAB.
- Maximum color temperature - The maximum kelvin to send to Home Assistant/OpenHAB.
- Reverse color temperature slider - Reverse the color temperature sliders on the NSPanel used to control color temperature on lights.
- Turn on behavior - Wether to send color temperature when turning on the light or to simply send the "turn on" command.
- Raise lights to 100% threshold - The slider on the NSPanel can be finiky to get to reach the maximum value of 100%. To solve this problem this option can be used to force the value to be 100% above the given value.
- Minimum button push time (ms) - The minimum amout of time (in milliseconds) for the physical buttons to be pressed for it to register as a button press.
- Minimum long press time (ms) - The minimum amout of time (in milliseconds) for the physical buttons to be pressed for it to register as a long button press.
- Special mode activation time (ms) - The minimum amout of time (in milliseconds) to press the "table" or "ceiling" light button on the main page before it locks to control only table or ceiling lights.
- Special mode timeout (ms) - How long to wait (in milliseconds) after the special mode has been used before releasing and returning the operate on all lights.
- Screen brightness (%) - The default screen brightness when the NSPanel is used, 1-100%.
- Screensaver brightness (%) - The default screensaver brightness when the NSPanel is not used, 0-100%.
- Screensaver activation timeout (ms) - Amount of time (in milliseconds) to wait before turning on the screensaver.
- Screensaver mode - Default screensaver mode. Available options are:
- Show with background (clock, date and weather) - Show the screensaver with background image with current and forecast weather, time and date.
- Show without background (clock, date and weather) - Show the screensaver with a black background with current and forecast weather, time and date.
- Show with background (no weather) - Show the screensaver with background image but only time and date.
- Show without background (no weather) - Show the screensaver with a black background but only time and date.
- No screensaver (turn off screen) - Make the screen completely black when not in use.
- Screensaver inside temperature - Should the inside temperature be displayed on the NSPanel.
- Screensaver outside temperature - Should the outside temperature be displayed on the NSPanel. Only available for screensaver pages without weather.
- MQTT ignore time (ms) - Time to wait (in milliseconds) after sending a command over MQTT before allowing new values to update the screen. This can be raised or lowered to minimize flickering of sliders on the NSPanel.
- **Optistmic mode ** - Replaces "MQTT Ignore time (ms)". When sending a command to set the state of a light or other entity, should we wait for a callback from Home Assistant or OpenHAB that a light has changed before updating the value on the NSPanel (Wait mode) or should we simply be optistmic and assume the values we sent will be set and immideatly update the displayed values on the NSPanel (optistmic mode).
- "All rooms" status backoff time (ms) - When a room changes state, how long should the manager wait before recalculating the new state for "All rooms" view/mode on the NSPanel (in milliseconds).
- "Default light turn on brightess - When a light has a brightness of 0 and the manager tries to turn it on it will default to this value.
MQTT
- MQTT address - The address used to connect to the MQTT server.
- MQTT port - The port used to connect to the MQTT server.
- MQTT username - Username used to authenticate to the MQTT server. Leave empty if not used.
- MQTT password - Password used to authenticate to the MQTT server. Leave empty if not used.
Home Assistant API
- Home Assistant address - The address used to connect to Home Assistant. This should include "http://" or "https://" in the beginning and port are the end.
- Access token - The long lived access token used to authenticate to Home Assistant.
OpenHAB API
- OpenHAB address - The address used to connect to OpenHAB. This should include "http://" or "https://" in the beginning and port are the end.
- Access token - The access token used to authenticate to OpenHAB.
Upload
You may have noticed that there is an "Upload" menu in the top menu bar. Below which there exists items for uploading new firmware, data file and also .tft files.
This menu is not something you will need to use unless instructed to. The items are used to upload new firmware, data files or GUI files for testing. It is mainly used for development and debugging.